reading-notes
https://faroukibrahim-fii.github.io/reading-notes/
HTML Lists, CSS Boxes, JS Control Flow
Lists
There are lots of occasions when we need to use lists. HTML provides us with three different types:
-
Ordered lists: are lists where each item in the list is numbered. For example, the list might be a set of steps for a recipe that must be performed in order, or a legal contract where each point needs to be identified by a section number.
-
Unordered lists: are lists that begin with a bullet point (rather than character;s that indicate order).
-
Definition lists: are made up of a set of terms along with the definitions for each of those terms.
Ordered Lists
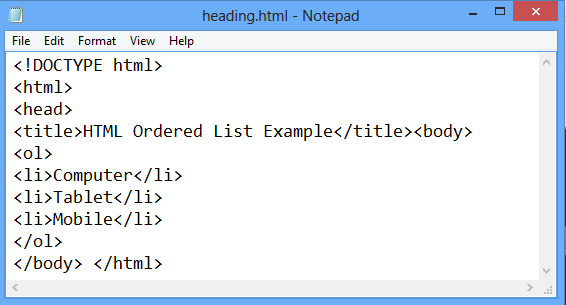
The ordered list is created with the <ol> element.
Each item in the list is placed between an opening <li> tag and a closing </li> tag. (The li stands for list item.)
This is how it looks in HTML
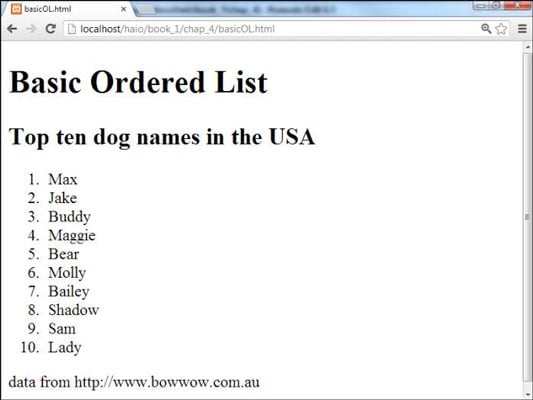
This is how it looks when presented in the browser
Unordered Lists
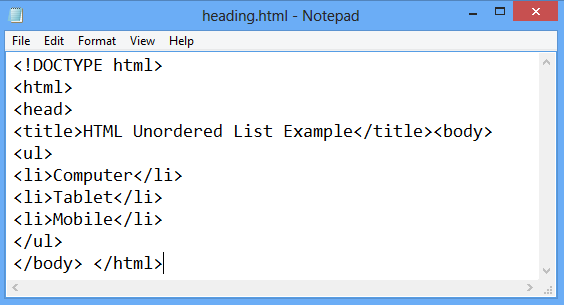
The unordered list is created with the <ul> element.
Each item in the list is placed between an opening <li> tag and a closing </li> tag. (The li stands for list item.)
This is how it looks in HTML
And this is how it looks when the browser present it:

Definition Lists
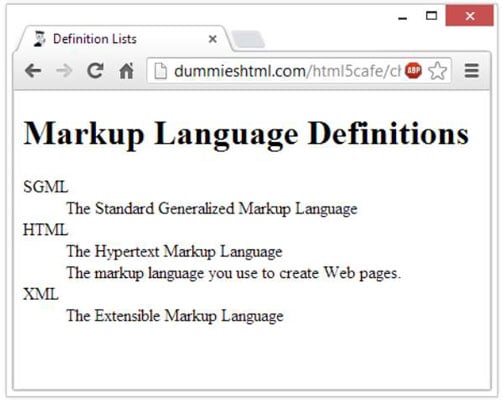
The definition list is created with the <dl> element and usually consists of a series of terms and their definitions. Inside the <dl> element you will usually see pairs of <dt> and <dd> elements.
-
<dt>This is used to contain the term being defined (the definition term). -
<dd>This is used to contain the definition.
This is how it looks in HTML

This is how it looks when the browser render it:
Nested Lists
You can put a second list inside an <li> element to create a sublist or nested list.

CSS Boxes
Box Dimensions: Width, height
By default a box is sized just big enough to hold its contents. To set your own dimensions for a box you can use the height and width properties.
The most popular ways to specify the size of a box are to use pixels, percentages, or ems. Traditionally, pixels have been the most popular method because they allow designers to accurately control their size.
When you use percentages, the size of the box is relative to the size of the browser window or, if the box is encased within another box, it is a percentage of the size of the containing box.
Limiting Width: min-width, max-width
Some page designs expand and shrink to fit the size of the user’s screen. In such designs, the min-width property specifies the smallest size a box can be displayed at when the browser window is narrow, and the max-width property indicates the maximum width a box can stretch to when the browser window is wide. These are very helpful properties to ensure that the content of pages are legible (especially on the smaller screens of handheld devices). For example, you can use the max-width property to ensure that lines of text do not appear too wide within a big browser window and you can use the min-width property to make sure that they do not appear too narrow.
Limiting Height: min-height, max-height
In the same way that you might want to limit the width of a box on a page, you may also want to limit the height of it. This is achieved using the min-height and max-height properties. The example on this page demonstrates these properties in action. It also shows you what happens when the content of the box takes up more space than the size specified for the box.
Overflowing content
The overflow property tells the browser what to do if the content contained within a box is larger than the box itself. It can have one of two values:
- hidden
This property simply hides any extra content that does not fit in the box.
- scroll This property adds a scrollbar to the box so that users can scroll to see the missing content. On the left, you can see two boxes whose contents expand beyond their set dimensions. The first example has the overflow property with a value of hidden. The second example has the overflow property with a value of scroll.
Border, Margin & Padding
Every box has three available properties that can be adjusted to control its appearance:
- Border Every box has a border (even if it is not visible or is specified to be 0 pixels wide). The border separates the edge of one box from another.
- Margin Margins sit outside the edge of the border. You can set the width of a margin to create a gap between the borders of two adjacent boxes.
- Padding Padding is the space between the border of a box and any content contained within it. Adding padding can increase the readability of its contents.
Border Width: border-width
The border-width property is used to control the width of a border. The value of this property can either be given in pixels or using one of the following values:
-
thin
-
medium
-
thick
Border Style: border-style
You can control the style of a border using the border-style property. This property can take the following values:
- solid a single solid line
- dotted a series of square dots (if your border is 2px wide, then the dots are 2px squared with a 2px gap between each dot)
- dashed a series of short lines
- double two solid lines (the value of the border-width property creates the sum of the two lines)
Border Color: border-color
You can specify the color of a border using either RGB values, hex codes or CSS color names (as you saw on pages 251-252).
It is possible to individually control the colors of the borders on different sides of a box using:
- border-top-color
- border-right-color
- border-bottom-color
- border-left-color
Shorthand: border
The border property allows you to specify the width, style and color of a border in one property (and the values should be coded in that specific order).
IE6 Box Model
When you specify the width of a box, any padding or margin should be added to the width of it. Internet Explorer 6, however, has a quirk whereby it includes the padding and margins in the width of the box.
The way around this is to ensure that you provide a DOCTYPE declaration for the HTML page. (DOCTYPE declarations were covered on page 181.) You can use either the HTML5, HTML 4 strict, or HTML 4 transitional DOCTYPE declarations to ensure that IE6 follows the correct box model.
Change Inline (Block): Display
The display property allows you to turn an inline element into a block-level element or vice versa, and can also be used to hide an element from the page. The values this property can take are:
- inline This causes a block-level element to act like an inline element.
- block This causes an inline element to act like a block-level element.
- inline-block This causes a block-level element to flow like an inline element, while retaining other features of a block-level element.
CSS3: Border Images - border-image
The border-image property applies an image to the border of any box. It takes a background image and slices it into nine pieces.
Here is the image. I have added marks where it is sliced in the example, taking 18 pixels from each corner to place an entire circle in each corner. The corner slices are always placed in the four corners of the box, but we have a choice whether the sides are stretched or repeated.
CSS3: Box Shadow - box-shadow
The box-shadow property allows you to add a drop shadow around a box. It works just like the text-shadow property that you met on page 288. It must use at least the first of these two values as well as a color:
-
Horizontal offset Negative values position the shadow to the left of the box. Vertical offset Negative values position the shadow to the top of the box.
-
Blur distance If omitted, the shadow is a olid line like a border.
-
Spread of shadow If used, a positive value will cause the shadow to expand in all directions, and a negative value will make it contract.

CSS3: Rounded Corners - border radius
CSS3 introduces the ability to create rounded corners on any box, using a property called border-radius. The value indicates the size of the radius in pixels.
Older browsers that do not support this property will show a box with right-angled corners.
The -moz-border-radius and -webkit-border-radius properties are not in the CSS specification. However, they are used in some versions of Chrome, Firefox, and Safari to offer early support for this style (and therefore can be used to achieve this effect in more browsers).
CSS3: Elliptical Shapes - border-radius
To create more complex shapes, you can specify different distances for the horizontal and the vertical parts of the rounded corners.
Using Quotes Inside a String
Sometimes you will want to use a double or single quote mark within a string.
Because strings can live in single or double quotes, if you just want to use double quotes in the string, you could surround the entire string in single quotes.
If you just want to use single quotes in the string, you could surround the string in double quotes.
You can also use a technique called escaping the quotation characters. This is done by using a backwards slash (or “backslash”) before any type of quote mark that appears within a string (as shown on the fourth line of this code sample). The backwards slash tells the interpreter that the following character is part of the string, rather than the end of it.
Using a Variable to Store a Boolean
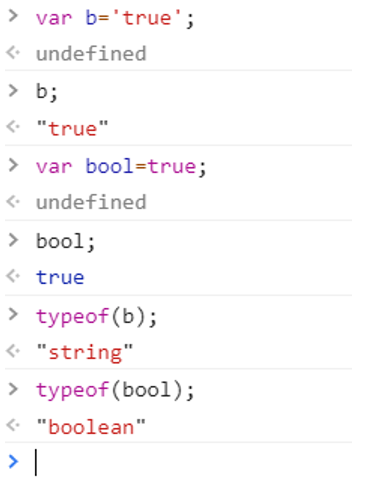
A Boolean variable can only have a va lue of true or false, but this data type is very helpful.
Shorthand for creating variables
Programmers sometimes use shorthand to create variables. Here are three variations of how to declare variables and assign them values:
- Variables are declared and values assigned in the same statement.
- Three variables are declared on the same line, then values assigned to each.
- Two variables are declared and assigned values on the same line. Then one is declared and assigned a value on the next line.
- A variable is used to hold a reference to an element in the HTML page. This allows you to work directly with the element stored in that variable.
Changing The Value of A variable
Once you have assigned a value to a variable, you can then change what is stored in the variable later in the same script.
Once the variable has been created, you do not need to use the var keyword to assign it a new value. You just use the variable name, the equals sign (also known as the assignment operator), and the new value for that attribute.
Comparing Two Expressions
In the comparison operator, the operand on the left calculates the user’s total score. The operand on the right adds together the highest scores for each round. The result is then added to the page.
When you assign the result of the comparison to a variable, you do not strictly need the containing parentheses.
Logical Operators
Comparison operators usually return single value of true or false. Logical operators allow you to compare the results of more than one comparison operator.

If statement
The if statement evaluates (or checks) a condition. If the condition evaluates to true, any statement in the subsequent code block are executed.
If…Else Statement
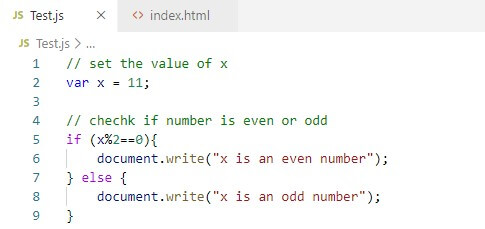
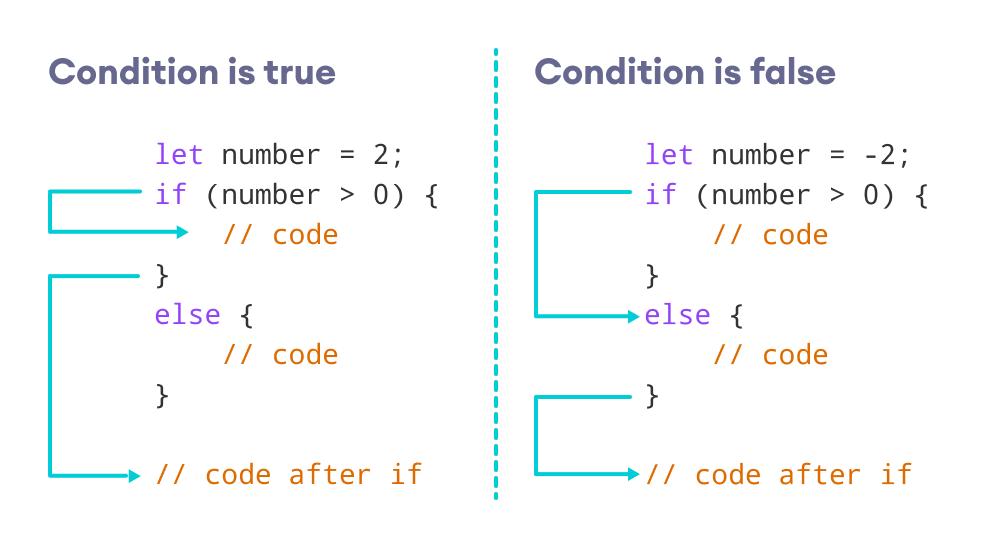
The if…else statement checks a condition.if it resolves to true the first code block is executed. If the condition resolves to false the second code block is run instead.
Switch Statements
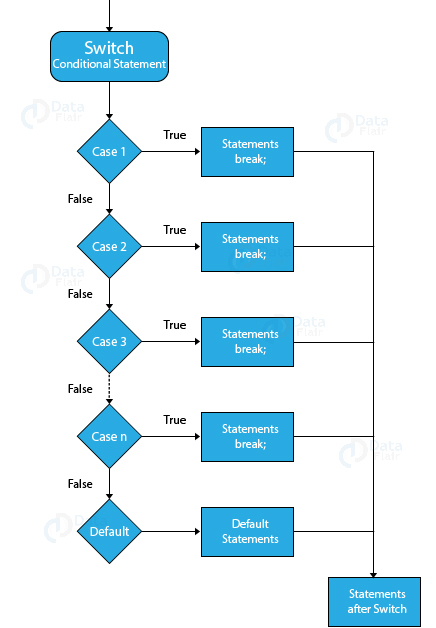
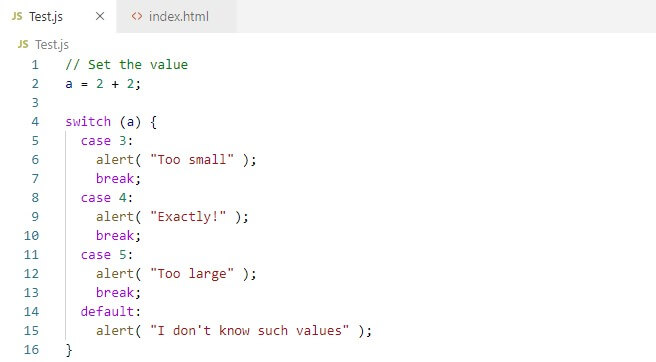
A switch statement starts with a variable called the switch value. Each case indicates a possible value for this variable and the code that should run if the variable matches thta value.
Truthy Falsy Values
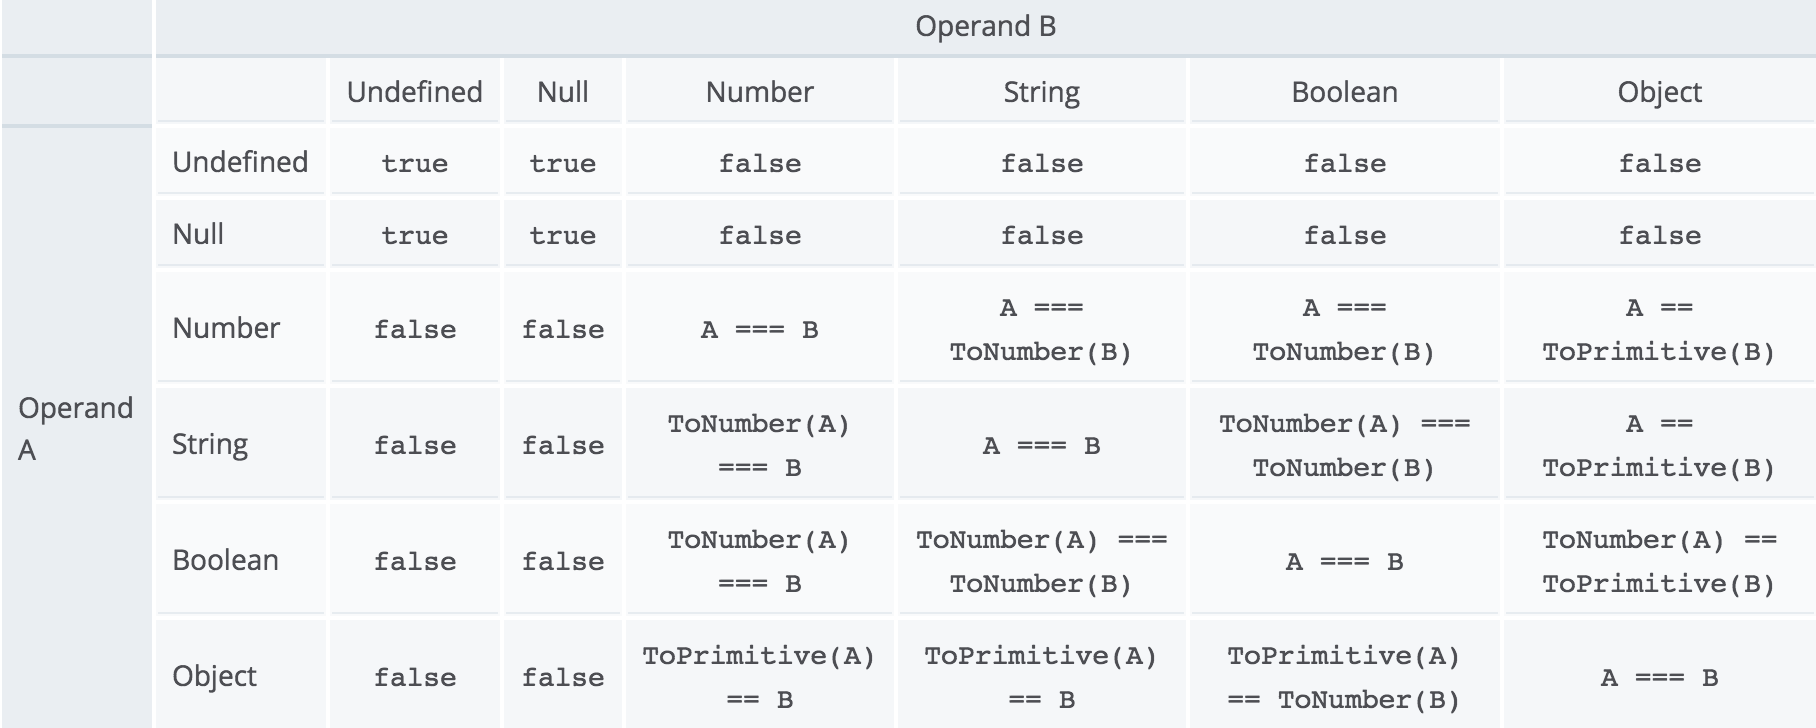
Due to type coercion, every value in JavaScript can be treated as if it were true or false; and this has some interesting side effects.
Loops
Lops check a condition. If it returns, a code block will run. Then the condition will be checked again and if it still returns true, the code block will run again. It repeats until the condition returns false.
-
For If you need to run code a specific number of times, use for loop.
-
While If you do not know how many times the code should run, you can use a while loop.
-
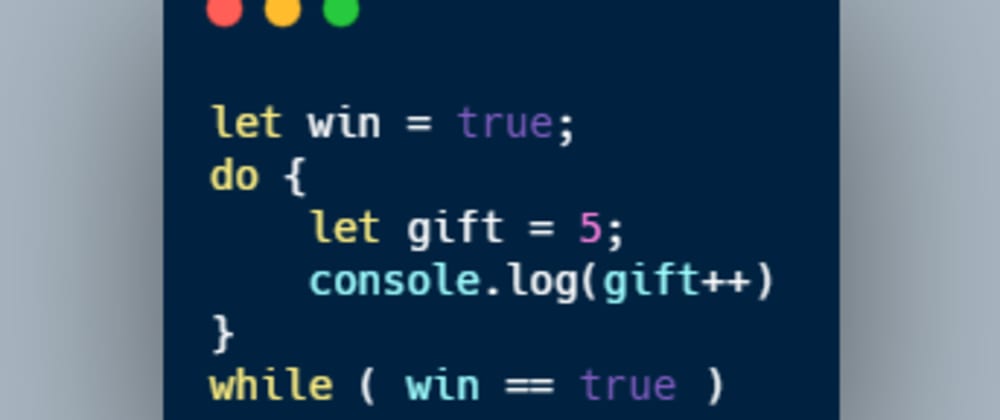
Do While The do…while loop is very similar to the while loop, but has one key difference: it will always run the statements inside the curly braces at least once, even if the condition evaluates to false.


Loop Counters
A for loop uses a counter as a condition. This instructs the code to run a specific number of times.
